IPアドレス直打ちアクセスを拒否する(apache2.4)

IPアドレスを直接ブラウザに入力した際に、意図しないページが表示されてしまうことを望まない場合が多くある。基本的に公開されたサービスは、独自ドメインでアクセスされたいので、apacheの拒否方法を実践してみる。
環境
今回試した環境は以下の環境です。
- CentOS7
- httpd2.4
まず最初に
apacheをインストールして、IPアドレスを入力してみる。
# インストール
yum -y install httpd

# 起動
systemctl start httpd
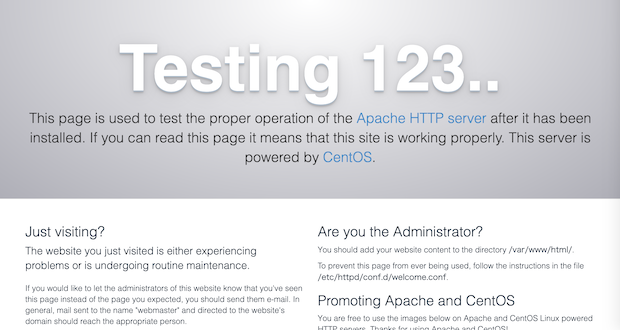
ブラウザにて、IPアドレスを直接入力してみます。

起動している事が確認できます。ですが、サービス運用していくにあたり、これが永遠と表示されてしまうのは避けたいところです。
このページはどこに?
httpd.confを見てみると、ドキュメントルートの記述があります。
/etc/httpd/conf/httpd.conf
DocumentRoot "/var/www/html"ですが、デフォルトでは、ここにファイルは存在しませんでした。
ではさきほどのデフォルト表示は、どこから来ているのだろうか。
/etc/httpd/conf.d/welcome.conf
このファイルもデフォルトで読み込まれている設定です。見てみます。
<LocationMatch "^/+$">
    Options -Indexes
    ErrorDocument 403 /.noindex.html
</LocationMatch>

<Directory /usr/share/httpd/noindex>
    AllowOverride None
    Require all granted
</Directory>

Alias /.noindex.html /usr/share/httpd/noindex/index.html
Alias /noindex/css/bootstrap.min.css /usr/share/httpd/noindex/css/bootstrap.min.css
Alias /noindex/css/open-sans.css /usr/share/httpd/noindex/css/open-sans.css
Alias /images/apache_pb.gif /usr/share/httpd/noindex/images/apache_pb.gif
Alias /images/poweredby.png /usr/share/httpd/noindex/images/poweredby.png
軽く読み解く
<LocationMatch "^/+$">
    Options -Indexes
    ErrorDocument 403 /.noindex.html
</LocationMatch>

【説明】
アクセスが「"^/+$"」にマッチしていたら、403ステータスで「/.noindex.html」を表示するという設定。
このLocationMatchの正規表現はIPアドレスのみを入力した場合も含まれるので、この設定が適用される。
ErrorDocument 403 /.noindex.html
&
Alias /.noindex.html /usr/share/httpd/noindex/index.html
【説明】
「/.noindex.html」が表示される設定だが、「/.noindex.html」というのは、
このファイルであるというのを記述してあるのが、Aliasの設定。
つまり実質見えているのは、このファイル。「/usr/share/httpd/noindex/index.html」IPアドレス直打ちに対する対処
IPアドレスの直打ちを拒否するということは、独自ドメインによるバーチャルホスト設定が入っているものとする。
【バーチャルホスト設定例】

<VirtualHost *:80>
  ServerName wordpress.example.com
  DocumentRoot /usr/local/apache/vhosts/wordpress.example.com/htdocs
  ErrorLog /usr/local/apache/vhosts/wordpress.example.com/logs/error_log
  CustomLog /usr/local/apache/vhosts/wordpress.example.com/logs/access_log combined
</VirtualHost>

<VirtualHost *:443>
  ServerName wordpress.example.com
  DocumentRoot /usr/local/apache/vhosts/wordpress.example.com/htdocs
  ErrorLog /usr/local/apache/vhosts/wordpress.example.com/logs/error_log
  CustomLog /usr/local/apache/vhosts/wordpress.example.com/logs/access_log combined
  SSLEngine on
  SSLCertificateFile /etc/letsencrypt/live/wordpress.example.com/fullchain.pem
  SSLCertificateKeyFile /etc/letsencrypt/live/wordpress.example.com/privkey.pem
</VirtualHost>

<Directory "/usr/local/apache/vhosts/wordpress.example.com/htdocs">
  Require all granted
  AllowOverride All
</Directory>
この設定を有効にしつつ、IPアドレスによる直接のアクセスを拒否する場合は、以下のような設定を追加する。
<VirtualHost *:80>
    ServerName any
    <Location />
        Require all denied
    </Location>
</VirtualHost>
この設定をVirtualHostの設定の一番上に記載しておくと、ServerNameにかかれていないものには、これが適用され、拒否されることとなる。
一番上に書くということなので、httpd.confのconf.d読み込みの前に記述することにした。
...略...
<VirtualHost *:80>
    ServerName any
    <Location />
        Require all denied
    </Location>
</VirtualHost>

# Supplemental configuration
#
# Load config files in the "/etc/httpd/conf.d" directory, if any.
IncludeOptional conf.d/*.conf
SSLの場合にも、同様の設定入れる。
<VirtualHost *:443>
  ServerName any
  <Location />
    Require all denied
  </Location>
</VirtualHost>
これで、http(80)の場合もhttps(443)の場合も、IPアドレスによる直接のアクセスが不可能となった。
さいごに
apacheやnginxなどのWEBサーバーをインストールした後や、apache用にmod_sslをインストールした後に、デフォルトで入っている設定について、よく確認しないまま公開してしまって、変な設定が入ったままになっていることには気をつけたいところ。
意外とIPアドレス直打ちの対応を忘れていたりすることがあって、(自分だけか。。
突然意図しないページが表示された時に、「え!?」ってなることが稀にある。も、もちろん、最近はないんだからねっ!!


