【ルービックキューブのタイマーを作る】第6回 IndexedDBでタイムを保存してみる回
第6回です。今回は前回のテストを踏まえて、実際に記録を保存する機能を作成してみる。
目次
ざっくりとした見通し
ちょっとまだどう組み込むかは決めていないのですが、IndexedDBと直接連絡し合う部分は、timer機能とは分離して実装しようと思います。
実装
なんやかんや数日試行錯誤して、たどり着いた結果がコレです。
public/js/database.js
初期処理を行うinit、データ保存するstoreData、保存したデータを取得するgetDataの関数を持つIndexedDB操作用のJSがこちら。ただし、今回はデータ保存がメインだったので、getDataはまだ未検証だと思ってくださいw
const CubeDB = {
    name: 'cube',
    version: 1,
    store: 'data',
    db: null,
    init() {
        const request = indexedDB.open(this.name, this.version);
        request.onupgradeneeded = (event) => {
            this.db = event.target.result;
            const objectStore = this.db.createObjectStore(this.store, {
                keyPath: "id", autoIncrement: true
            });
            const datasetIndex = objectStore.createIndex("by_dataset", "dataset");
        };
        request.onsuccess = (event) => {
            this.db = event.target.result;
        };
    },
    storeData(data) {
        const transaction = this.db.transaction([this.store], "readwrite");
        const objectStore = transaction.objectStore(this.store);
        objectStore.put({dataset: data.dataset, time: data.time, scramble: data.scramble, date: data.date});
    },
    getData(dataset) {
        const transaction = this.db.transaction([this.store]);
        const objectStore = transaction.objectStore(this.store);
        const index = store.index("by_dataset");
        const request = index.getAll(dataset);
        return new Promise((resolve, reject) => {
            request.onsuccess = (event) => {
                resolve(request.result ? request.result.data : null);
            };
            request.onerror = (event) => {
                reject(new Error("Data retrieval failed"));
            };
        });
    },
};
CubeDB.init();
まだまだIndexedDBは完璧ではないですが、こんな感じで実装してみた。
resources/js/timer.js
const cubelog_timer = {
    // ステータス
    currentStatus: '',
    // ステータス値
    status: {
        neutral: 0,
        wait: 1,
        ready: 2,
        timer: 3
    },
    // タイマーオブジェクト
    cubeTimer: '',
    // タイマー表示インターバル
    cubeTimerInterval: 37,
    // 開始時間
    startTime: 0,
    // 経過時間
    elapsedTime: 0,
    // スクランブル
    // 長押しタイマー
    longPushTimer: '',
    // 長押し判定値
    longPushWaitTime: 600,
    // キーコード
    keys: {
        Space: 32,
    },

    init: function () {
        this.currentStatus = this.status.neutral;
        window.addEventListener('keydown', (event) => {
            this.keyDown(event);
        });
        window.addEventListener('keyup', (event) => {
            this.keyUp(event);
        });
        // スクランブル情報の取得
        this.scramble();
    },
    keyDown: function (event) {
        if (event.keyCode !== this.keys.Space) {
            return false;
        }

        // 長押し開始時
        if (this.currentStatus === this.status.neutral) {
            document.getElementById('timer').classList.add('wait');
            this.currentStatus = this.status.wait;
            this.longPushTimer = setTimeout(function () {
                this.ready();
            }.bind(this), this.longPushWaitTime);
        }

        // タイマー終了時
        if (this.currentStatus === this.status.timer) {
            // タイマー停止
            clearTimeout(this.cubeTimer);
            // 最終タイマー表示
            this.timerView();
            // データ保存処理
            this.timerStore();
            // 初期化処理
            this.currentStatus = this.status.neutral;
            // スクランブル再表示
            this.scramble();
        }

    },
    keyUp: function (event) {
        if (event.keyCode !== this.keys.Space) {
            return false;
        }

        // 共通処理
        clearTimeout(this.longPushTimer);
        document.getElementById('timer').classList.remove('wait');
        // 長押し完了前の処理
        if (this.currentStatus === this.status.wait) {
            this.currentStatus = this.status.neutral;
        }
        // 長押し完了後の処理
        if (this.currentStatus === this.status.ready) {
            this.currentStatus = this.status.timer;
            this.startTime = Date.now();
            this.timer();
        }
    },
    ready: function () {
        if (this.currentStatus !== this.status.wait) {
            return false;
        }
        // 長押し完了処理
        this.currentStatus = this.status.ready;
        document.getElementById('timer').textContent = '0.00';
        document.getElementById('timer').classList.remove('wait');
        document.getElementById('timer').classList.add('ready');
    },
    timer: function () {
        document.getElementById('timer').classList.remove('wait');
        document.getElementById('timer').classList.remove('ready');
        // タイマー表示処理
        this.cubeTimer = setInterval(function () {
            this.timerView();
        }.bind(this), this.cubeTimerInterval);
    },
    timerView: function () {
        this.elapsedTime = Date.now() - this.startTime;
        const minutes = Math.floor((this.elapsedTime / 1000 / 60) % 60);
        const seconds = Math.floor((this.elapsedTime / 1000) % 60);
        const milliseconds = Math.floor((this.elapsedTime % 1000) / 10);
        if (minutes > 0) {
            document.getElementById('timer').textContent = String(minutes) + ':' + String(seconds).padStart(2, '0') + '.' + String(milliseconds).padStart(2, '0');
        } else {
            document.getElementById('timer').textContent = String(seconds) + '.' + String(milliseconds).padStart(2, '0');
        }
    },
    timerStore: function () {
        let data = {
            dataset: 1,
            date: Date.now(),
            scramble: document.getElementById('scramble').textContent,
            time: this.elapsedTime
        }
        CubeDB.storeData(data);
    },
    scramble: function () {
        var xhr = new XMLHttpRequest();
        xhr.open('GET', '/api/scramble');
        xhr.send();
        xhr.onreadystatechange = () => {
            if (xhr.readyState === XMLHttpRequest.DONE) {
                if (xhr.status === 200) {
                    const json = JSON.parse(xhr.responseText);
                    document.getElementById('scramble').textContent = json.scramble.text;
                }
            }
        }
    }
};

cubelog_timer.init();
64行目 スクランブルの再表示処理を追加
これは、記録が保存し終わった後に、スクランブル表示を更新する処理です。
            // スクランブル再表示
            this.scramble();
117行目 timerStore処理の実装
実データを用意して、新しく作成したJSのstoreData処理に流す。
    timerStore: function () {
        let data = {
            dataset: 1,
            date: Date.now(),
            scramble: document.getElementById('scramble').textContent,
            time: this.elapsedTime
        }
        CubeDB.storeData(data);
    },
データは保存できるのか・・・
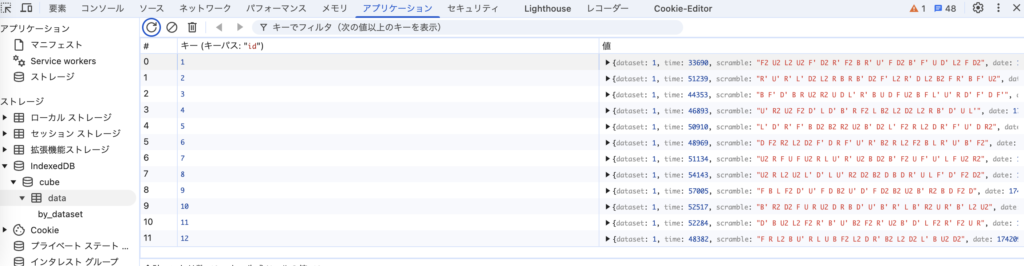
やったー!!!
嬉しくて、サンプルデータの画像が欲しかっただけなのに、12回もやっちゃってますw
小さくて見にくいですが、timeの欄が記録です(単位はmsec)。だいたい50秒台付近で安定してる記録ですね。運が良いときは、30秒台。
まとめ
さて、無事にIndexedDBを使ってデータを保存することが出来ました。IndexedDBは私個人的な感想としてわりと癖があって、数日間苦労しました!なんとか形になりました!
次回は、保存した記録の表示処理に進みたいと思います。
今回のソースコード
本日の実装が完了した状態のタグが「v1.0.6」です。
https://github.com/supilog/cube/tree/v1.0.6
- public/js/database.js
- resources/js/timer.js
- resources/views/index.blade.php